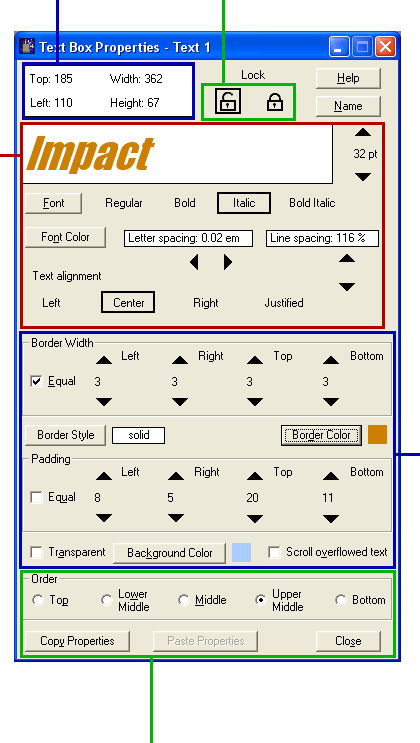
Text Box Properties Dialog
Cascade DTP V4
The position and size of the selected text box measured in pixels is displayed here. Click this area to enter values directly.
You can prevent a selected text box being accidentally moved or re-sized by clicking the lock symbol [Ctrl + K]. To unlock a selected text box, click the unlock symbol [Ctrl + U].
The selected font is displayed within the white box (this will become black if the chosen font color is too light to show properly against a white background). Clicking Font will launch a dialog enabling selection of web-safe fonts (i.e. fonts that are guaranteed be installed on nearly all Windows PCs).
The font size can be altered by clicking the arrow keys above and below the font size (right of white box). To alter the font size in increments of 10 points, use the right mouse button. If the font size is increased above 36 points, the display size will be restricted to this value (to indicate this, the font size will be shown in red).
Reducing the font size below 2 points will change the setting to "None". Choose this setting when you do not want the CSS code to dictate the displayed font size - i.e. so that the user can vary the size themselves using browser controls.
You can also change the font style, color. alignment, letter spacing and line spacing. The default values for letter spacing and line spacing are 0 em and 120% respectively.
The Order option button setting determines whether the box will appear underneath or on top of any other text or image box that it overlaps. For example, a box with Order set to Upper Middle will appear on top of a box with Order set to Middle. Note: The page layout within Cascade DTP will not show the effect of the Order settings - to see these you must click Preview on the menu bar [F12] and view the page in your browser.
Clicking Copy Properties will store the currently selected text box properties (but not any text placed in it) on a special clipboard used exclusively by this dialog. It will then be possible to transfer the stored settings to any other box by selecting it and then clicking Paste Properties (the Paste properties button will remain disabled until Copy Properties has been clicked).
To create a visible border, click the Border Width arrow symbols. To change the width in increments of 10 pixels, use the right mouse button. Checking Equal will ensure that all four borders have the same width (you can then use any of the up or down arrow symbols to change this value).
Clicking Border Style will launch a dialog showing a selection of borders that will render correctly in nearly all browsers.
Padding creates a space around any text. This prevents the text butting too close against the box border (the text within this box is padded equally by 4 pixels).
To set a background color for the box, uncheck Transparent and then click Background Color.
Checking Scroll overflowed text will instruct the browser to display a scroll bar at the edge of the box. Use this facility to display a large amount of text in a box that would otherwise be too small to contain it.

